It was a sweltering July afternoon, the kind where the cicadas seem to sing a lazy lullaby while the kitchen fan hums in protest. I was rummaging through a tin of key limes that my aunt had sent from Florida, the bright green rind promising a burst of sunshine in every drop. The moment I squeezed the first few drops into a glass, a sharp, citrusy perfume filled the air, instantly transporting me to a breezy beach porch with a glass of cold lemonade in hand. I thought, “What if I could capture that exact moment in a dessert that’s creamy, tangy, and just a little bit indulgent?” The answer, of course, was a Key Lime Cheesecake that would become the star of every family gathering for years to come.
The first time I tried this cheesecake, I remember the crust cracking just enough to give a satisfying crunch before melting into the silky filling. The aroma of toasted graham crackers mingled with the zest of lime, creating a scent that made my guests’ mouths water before they even saw a slice. As we cut into the cake, the bright green interior glistened like a tropical lagoon, and the first bite was a perfect harmony of tart lime, sweet cream, and buttery crust. It’s moments like these that make cooking feel like a love letter to the people you care about, and I’m convinced that once you taste this version, you’ll never settle for a store‑bought slice again.
What makes this recipe stand out isn’t just the ingredients—it’s the little secrets I’ve collected over countless baking sessions. From the precise temperature of the oven to the exact moment you fold in the whipped cream, each detail is designed to give you a cheesecake that’s both airy and dense in all the right places. And because I’m a firm believer in sharing the full story, I’ll walk you through every step, sprinkling in anecdotes, pro tips, and even a few cautionary tales along the way. Have you ever wondered why a cheesecake can sometimes turn out grainy or why the crust sometimes slides off the pan? Trust me, the answers are coming up soon.
So, grab your favorite mixing bowl, preheat that oven, and get ready to dive into a dessert that feels like a mini vacation with every forkful. Here’s exactly how to make it — and trust me, your family will be asking for seconds, thirds, and maybe even a fourth slice before the plate is even cleared.
🌟 Why This Recipe Works
- Flavor Depth: By combining fresh key lime juice with grated zest, the cheesecake gets a layered citrus punch that’s both bright and lingering, ensuring each bite feels fresh.
- Texture Balance: The creamy cream cheese base is lightened with plain yogurt and whipped heavy cream, giving you that melt‑in‑your‑mouth silkiness without feeling heavy.
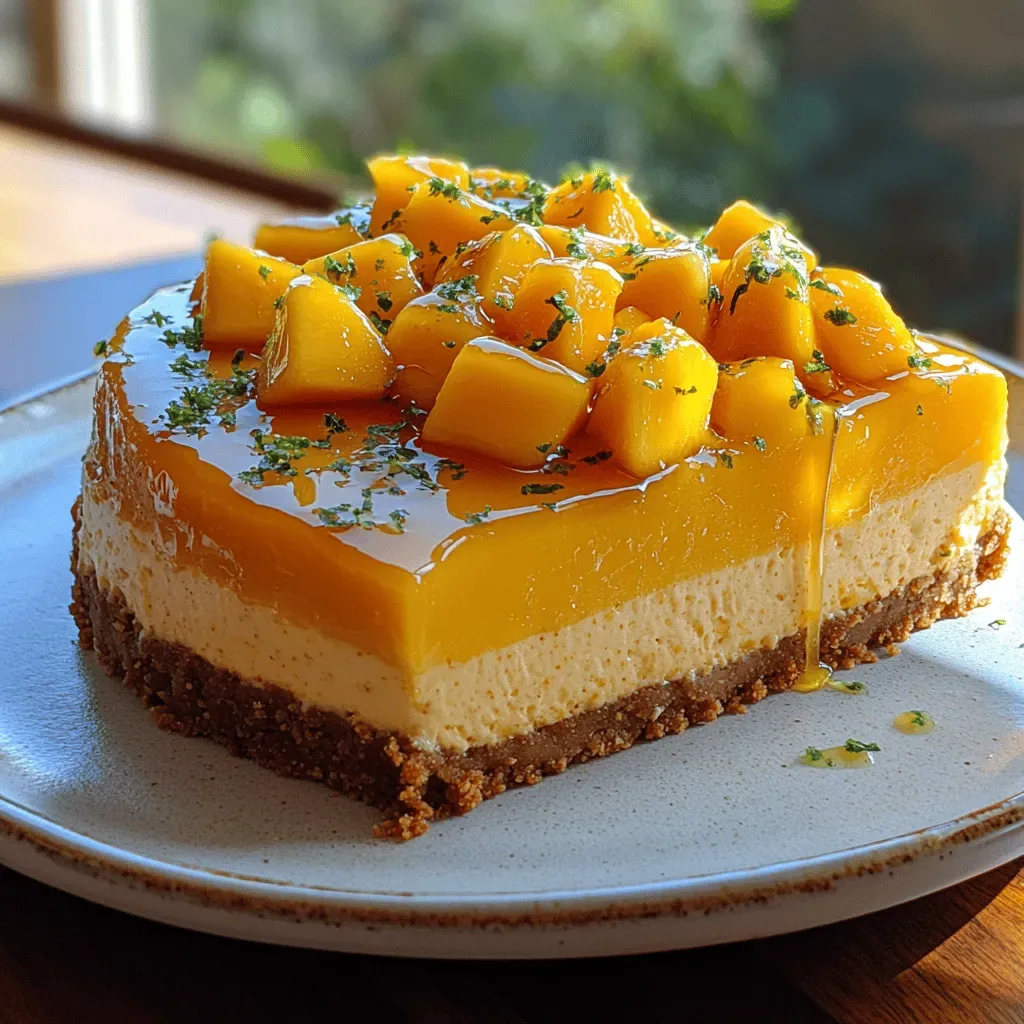
- Easy Crust: Crushed graham crackers mixed with melted butter create a buttery, crunchy foundation that holds together without the need for a pan liner.
- Time‑Smart: The whole process, from prep to bake, fits neatly into a single evening, making it perfect for a weekend dinner or a special occasion.
- Versatility: The base flavor is classic, but you can easily tweak it with coconut, raspberry, or even a chocolate swirl for a personalized twist.
- Nutrition Boost: Using plain yogurt adds protein and a slight tang while keeping the overall fat content moderate, especially when you balance with a light whipped topping.
- Crowd‑Pleaser: The vibrant green hue and citrus aroma make it a visual centerpiece, while the balanced sweetness appeals to both kids and adults.
🥗 Ingredients Breakdown
The Foundation: Crust Essentials
Crushed graham crackers are the unsung heroes of any cheesecake, providing a sweet, buttery base that anchors the creamy filling. Their fine texture ensures the crust sets firmly, yet remains tender enough to crumble with a gentle press of the fork. If you’re out of graham crackers, you can substitute with digestive biscuits or even vanilla wafer crumbs for a slightly different flavor profile. When choosing your crackers, look for ones that are fresh and not overly sweet; a subtle caramel note works best.
Granulated sugar in the crust isn’t just about sweetness—it helps bind the crumbs together and contributes to that golden‑brown finish once baked. A pinch of extra sugar can also enhance the caramelization, giving the crust a whisper of crispness that contrasts beautifully with the silky filling. And remember, the butter should be melted but not hot; this prevents the crumbs from becoming soggy and ensures an even distribution.
The Creamy Core: Filling Fundamentals
Softer cream cheese is the star of the show, delivering that rich, velvety texture we all crave in a cheesecake. I always let it sit at room temperature for about 30 minutes before mixing; this makes it easier to blend without lumps, resulting in a smoother batter. More granulated sugar is added to the filling to balance the tartness of the key lime juice, creating a harmonious sweet‑tart dance on the palate.
Large eggs act as the structural backbone, setting the cheesecake as it bakes and preventing it from cracking. I recommend beating them just until combined—over‑whipping can incorporate too much air, which leads to a spongy texture. Plain yogurt adds a subtle tang and extra creaminess, while also lightening the overall density of the filling.
Fresh or bottled key lime juice provides that signature zesty punch; if you can, always opt for fresh juice for maximum brightness. Grated key lime peel, or zest, adds an aromatic layer that you can actually smell as you slice into the cake—think of it as the perfume to the flavor’s perfume.
A splash of vanilla essence rounds out the flavor, smoothing the edges of the citrus and adding a comforting, familiar note that ties everything together.
The Light Touch: Whipped Topping
Heavy cream, when whipped to soft peaks, introduces an airy lift that contrasts the dense cheesecake, making each bite feel lighter than it actually is. Confectioners’ sugar sweetens the whipped cream without the grainy texture of regular sugar, ensuring a silky finish that melts on the tongue. For an extra dash of drama, garnish with optional lime wedges and zest; the bright green specks not only look stunning but also give a burst of fresh aroma right before the first bite.
With your ingredients prepped and ready, let's get cooking. Here's where the fun really begins...

🍳 Step-by-Step Instructions
-
Preheat your oven to 325°F (163°C) and line the bottom of a 9‑inch springform pan with parchment paper. While the oven warms, combine the crushed graham crackers, 1/4 cup granulated sugar, and melted unsalted butter in a medium bowl. Stir until the mixture resembles wet sand, then press it firmly into the pan’s bottom, creating an even layer. The crust should be compact but not packed so tightly that it becomes hard; a gentle press with the back of a spoon works wonders. Pro tip: Chill the crust for 10 minutes while you prep the filling to help it set faster.
💡 Pro Tip: If you want a deeper color, sprinkle a tiny pinch of sea salt over the crust before baking—it enhances the caramel notes. -
In a large mixing bowl, beat the softer cream cheese on medium speed until smooth and free of lumps—this usually takes about 2 minutes. Gradually add the second portion of granulated sugar (1/2 cup) and continue beating until the mixture is light and fluffy. This is the moment where the kitchen fills with a faint sweet scent, signaling that the base is ready for the citrus infusion.
-
Add the eggs one at a time, beating just until incorporated after each addition. Over‑mixing can trap air, which may cause cracks during baking, so keep the speed low and stop once the eggs are just blended. Then, whisk in the plain yogurt, key lime juice (about 1/3 cup), grated key lime peel, and vanilla essence. The mixture will turn a vivid pale green, and you’ll notice a fragrant citrus perfume rising from the bowl—trust that aroma; it’s a good sign.
⚠️ Common Mistake: Adding the eggs too quickly can cause the batter to curdle. Add them slowly and stop mixing as soon as they’re just combined. -
Gently fold in the whipped heavy cream. To whip the cream, beat it on high speed until soft peaks form, then add confectioners’ sugar and a splash of vanilla, continuing to beat until just stiff peaks appear. Fold the whipped cream into the cheesecake batter using a spatula, turning the bowl over a few times. This step creates a light, airy texture that prevents the final product from feeling too dense.
💡 Pro Tip: Use a silicone spatula for folding; its flexibility helps preserve the air you just whipped into the cream. -
Pour the filling over the chilled crust, smoothing the top with an offset spatula. Tap the springform pan lightly on the counter three times to release any trapped air bubbles. The surface should be level and glossy, hinting at the smooth bite that awaits.
-
Place the springform pan on a baking sheet and slide it into the preheated oven. Bake for 35‑40 minutes, or until the edges are set and the center still has a gentle jiggle when you shake the pan. The edges will turn a light golden hue, while the center stays a pale green—this contrast tells you the cheesecake is perfectly baked.
💡 Pro Tip: Turn the oven off and leave the cheesecake inside with the door ajar for 1 hour. This gradual cooling prevents cracks caused by sudden temperature changes. -
After the hour of residual heat, remove the cheesecake and let it cool completely on a wire rack. Once cooled, refrigerate for at least 4 hours, preferably overnight. This chilling time allows the flavors to meld and the texture to firm up, giving you clean, elegant slices.
-
Just before serving, whip a fresh batch of heavy cream with confectioners’ sugar and a dash of vanilla until stiff peaks form. Pipe or dollop the whipped cream over each slice, then garnish with optional lime wedges and a light sprinkling of grated zest. The final presentation looks like a tropical oasis on a plate, and the contrast between the cool cream and the tangy cheesecake is pure bliss. And the result? A dessert that’s as photogenic as it is unforgettable.
And there you have it! But before you dig in, let me share some tips that will take this from great to absolutely unforgettable...
🔐 Expert Tips for Perfect Results
The Taste Test Trick
Before you pour the filling into the crust, take a tiny spoonful and taste it. If the lime flavor feels a bit shy, add a splash more juice or a pinch of zest. This quick check ensures the final cake will hit that perfect balance of sweet and tart that makes everyone smile.
Why Resting Time Matters More Than You Think
Allowing the cheesecake to chill overnight isn’t just about convenience; it’s a science. The proteins in the cream cheese and eggs continue to set, creating a denser, smoother texture. I once sliced a cheesecake after only two hours and noticed a slightly grainy mouthfeel—once I extended the chill, the difference was night and day.
The Seasoning Secret Pros Won’t Tell You
A pinch of sea salt sprinkled over the top just before baking can amplify the citrus notes, making them pop more dramatically. It’s a subtle trick that professional pastry chefs use to avoid a flat flavor profile, and it works wonders here, especially when you’re serving guests who love bold tastes.
Avoiding the Cracking Catastrophe
Cracks usually appear when the cheesecake cools too quickly. That’s why the “oven‑off, door‑ajar” method is a lifesaver. If you’re in a rush, you can also place a pan of hot water on the lower rack to create a gentle steam environment, which keeps the surface moist as it sets.
Whipping Cream Without Over‑Beating
When whipping heavy cream for the topping, stop as soon as you see soft peaks. Over‑whipped cream turns buttery and can separate, ruining the lightness you’re aiming for. A quick visual cue—when the peaks hold their shape but the tip of the whisk still looks slightly glossy—is your green light.
🌈 Delicious Variations to Try
One of my favorite things about this recipe is how versatile it is. Here are some twists I've tried and loved:
Coconut Lime Dream
Swap half of the graham cracker crust for toasted coconut flakes and stir a tablespoon of coconut milk into the filling. The result is a tropical duet of lime and coconut that transports you straight to a beachside cabana.
Berry‑Burst Lime
Fold a cup of fresh raspberry puree into the batter before baking. The berries add a subtle sweet‑tart contrast, and their pink hue creates a beautiful marbled effect against the green lime base.
Chocolate Swirl Sensation
Melt 1/4 cup dark chocolate and drizzle it in ribbons over the batter, then use a knife to swirl it gently. The bittersweet chocolate pairs beautifully with the citrus, offering a sophisticated flavor pairing.
Spiced Lime
Add a pinch of ground ginger and a dash of cayenne pepper to the filling for a warm, spicy kick. This variation is perfect for those who love a little heat to balance the sweet and sour.
Mint‑Infused Lime
Steep a handful of fresh mint leaves in the key lime juice for five minutes, then strain before mixing. The mint adds a refreshing undertone that makes the cheesecake feel even lighter on a hot day.
📦 Storage & Reheating Tips
Refrigerator Storage
Cover the cheesecake loosely with plastic wrap or store it in an airtight container. It will stay fresh for up to five days, though the texture is best within the first three. If you notice condensation, gently pat the surface with a paper towel before serving to keep the topping fluffy.
Freezing Instructions
For longer storage, slice the cheesecake into individual portions, wrap each slice tightly in cling film, then place them in a freezer‑safe bag. The cheesecake freezes well for up to two months. To thaw, move the slices to the fridge overnight; the creamy texture remains intact.
Reheating Methods
If you prefer a warm slice, place a single piece on a microwave‑safe plate and heat for 10‑15 seconds—just enough to take the chill off without melting the topping. For oven reheating, set the oven to 300°F (150°C) and warm the slice for about 5 minutes, covering it loosely with foil to prevent the top from drying out. The trick to reheating without drying it out? A splash of lime juice or a drizzle of milk added just before warming keeps the crumb moist.