It was a chilly Saturday afternoon in November, the kind of day when the wind whistles through the trees and the kitchen becomes the warmest room in the house. I was rummaging through my pantry, trying to decide whether to bake a batch of classic chocolate chip cookies or pull out the old family‑favorite crumble cookie recipe that my grandma swore by. The moment I lifted the lid of the tin, a cloud of buttery, caramel‑kissed steam rose up, wrapping the room in a hug that smelled like a cozy blanket fresh out of the dryer. That scent sparked a memory of my childhood, of sitting at the kitchen table while my sister and I tried to sneak extra bites when Mom wasn’t looking. Have you ever wondered why that same simple cookie can feel like a celebration every single time you bake it?
I decided then and there to recreate the legendary crumble cookie that has been a secret weapon at every family gathering for generations. The original was a well‑kept secret at my aunt’s café, a copycat that somehow managed to capture the perfect balance of crisp edges, a soft, chewy center, and that irresistible crumble that melts on the tongue. I spent a weekend experimenting, tweaking the butter temperature, adjusting the sugar ratios, and even adding a dash of vanilla that seemed to unlock a whole new depth of flavor. The result? A cookie that looks like a golden‑brown treasure, sounds like a gentle crackle when you bite into it, and tastes like a warm hug from the inside out. Trust me, once you try this version, you’ll understand why it’s been the talk of my family for years.
But wait—there’s a secret trick hidden in step four that takes these cookies from “delicious” to “absolutely unforgettable.” I’ll reveal that later, but first let’s talk about why this recipe works so well and why you’ll want to add it to your baking arsenal right now. Imagine the aroma of melted chocolate chips mingling with a faint hint of caramelized butter drifting through your home, drawing everyone to the kitchen like moths to a flame. The best part? The recipe is straightforward enough for a beginner, yet sophisticated enough to impress even the most discerning palate.
Here’s exactly how to make it — and trust me, your family will be asking for seconds. Grab a mixing bowl, preheat your oven, and get ready to dive into a world of buttery bliss. As we walk through each step, I’ll sprinkle in some personal anecdotes, pro tips, and a few warnings that will save you from common pitfalls. By the end of this article, you’ll not only have a batch of cookies that could rival any bakery, but you’ll also have a deeper appreciation for the science and love that goes into every crumb. Let’s get started!
🌟 Why This Recipe Works
- Flavor Depth: The combination of granulated sugar and brown sugar creates a layered sweetness where the brown sugar adds moisture and a caramel‑like undertone, while the white sugar gives that crisp, caramelized edge. This dual‑sugar approach is why the cookie feels both buttery and richly sweet, rather than one‑dimensional.
- Texture Harmony: All‑purpose flour provides just the right amount of structure to keep the cookie from spreading too thin, while the softened butter creates a tender crumb that crumbles gently under your teeth. The result is a perfect balance between a crunchy exterior and a soft, chewy interior.
- Ease of Execution: The recipe uses everyday pantry staples, so you don’t need any exotic ingredients or special equipment. Even if you’re a weekend baker, the steps are simple, logical, and forgiving enough to allow a little flexibility.
- Time Efficiency: With a prep time of just 15 minutes and a bake time of 30 minutes, you can have fresh, warm cookies on the table in under an hour. This makes it ideal for spontaneous gatherings or last‑minute dessert cravings.
- Versatility: While the core recipe shines on its own, you can easily swap in different mix‑ins—white chocolate, dried cranberries, or toasted nuts—to match the season or your personal taste. The base is sturdy enough to support a variety of flavor experiments.
- Ingredient Quality: Using pure vanilla extract and high‑quality chocolate chips elevates the overall flavor profile, turning a humble cookie into a gourmet treat. The subtle aromatic notes of vanilla weave through each bite, enhancing the chocolate’s richness.
- Crowd‑Pleasing Factor: The crumble cookie’s signature texture and familiar chocolate chip flavor make it a guaranteed hit with kids, teens, and adults alike. It’s the kind of cookie that disappears from the plate faster than you can say “one more.”
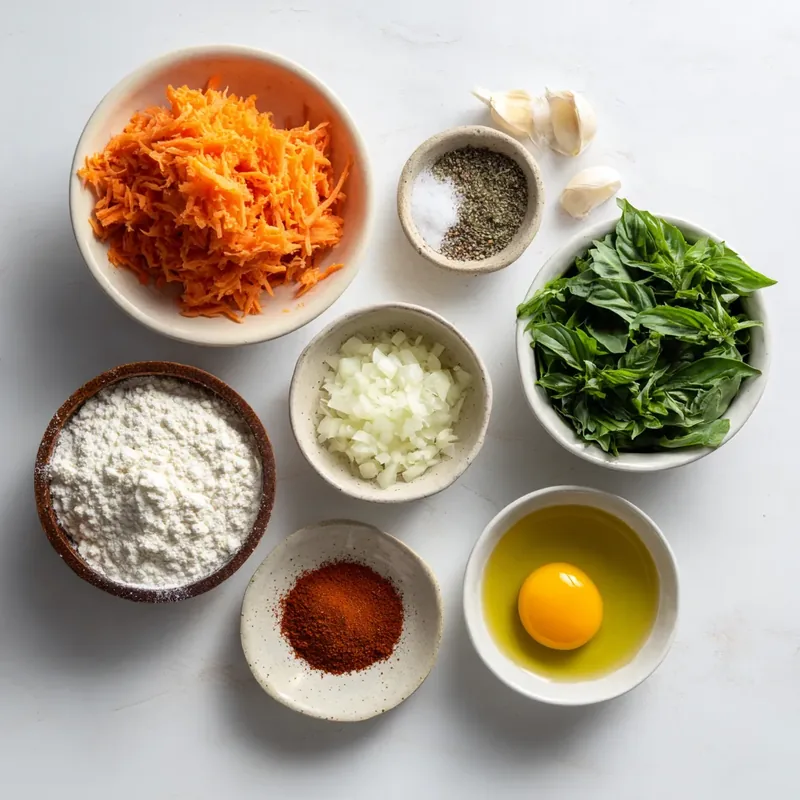
🥗 Ingredients Breakdown
The Foundation
All‑Purpose Flour is the backbone of any cookie, providing structure and chewiness. It creates a network that holds the dough together while allowing it to spread just enough during baking. If you swap it for cake flour, the cookies become too delicate; if you use bread flour, they’ll be overly tough. Choose a flour that’s fresh—older flour can develop off‑flavors that dull the overall taste.
Granulated Sugar adds sweetness and helps create that beautiful golden‑brown color. It caramelizes quickly in the oven, giving the cookie its signature crisp edge. When measuring, be sure to sift it with the flour to avoid clumps that could affect texture. A small tip: using a kitchen scale for both flour and sugar ensures perfect balance every time.
Brown Sugar brings moisture and a rich, caramel‑like flavor; it’s like a secret weapon in cookie baking. The molasses in brown sugar retains moisture, keeping the cookie soft in the center even after cooling. If you prefer a deeper flavor, you can use dark brown sugar, but remember it will add a slightly stronger molasses note.
Aromatics & Leaveners
Baking Soda is a leavening agent that gives our cookies that delightful lift, creating tiny air pockets that make each bite airy yet dense enough to hold the chocolate chips. Too much soda can cause a metallic taste, so measure carefully. If you’re out of baking soda, you can substitute with a pinch more baking powder, but the texture will be a bit different.
Salt, just a pinch, enhances all the sweet flavors; don’t skip this! It balances the sweetness and amplifies the chocolate’s richness. Sea salt flakes sprinkled on top just before baking can add a sophisticated crunch that contrasts nicely with the soft interior.
The Secret Weapons
Unsalted Butter, softened to room temperature, creates that creamy texture we love in cookies. The butter’s fat content is essential for flavor and mouthfeel; using salted butter can throw off the delicate balance of flavors. For an extra nutty note, try browning the butter lightly before letting it cool—just be sure to strain out the brown bits before mixing.
Eggs bind everything together while adding richness; use them at room temperature for best results. The protein in the eggs helps set the structure, while the yolk adds a velvety mouthfeel. If you’re avoiding eggs, a blend of ¼ cup applesauce and ¼ teaspoon baking powder can mimic the binding effect, though the flavor will shift slightly.
Vanilla Extract, a splash of pure vanilla, adds warmth and depth; go for pure vanilla if you can. It rounds out the flavors, making the sweetness feel less sharp and more rounded. A dash of almond extract can also be used in combination with vanilla for a subtle nutty undertone.
Finishing Touches
Chocolate Chips, semi‑sweet or milk chocolate, bring the gooey goodness that makes crumble cookies legendary. The chips should be folded in gently to avoid melting them before baking, ensuring they stay whole and melt just enough in the oven. If you want a twist, try using a mix of white chocolate and dark chocolate for a marbled effect.
With your ingredients prepped and ready, let's get cooking. Here’s where the fun really begins…

🍳 Step-by-Step Instructions
Preheat your oven to 350°F (175°C) and line two baking sheets with parchment paper. While the oven warms up, take a moment to admire the gleam of the butter as it softens on the countertop; this is the first sign that magic is about to happen. The parchment paper not only prevents sticking but also helps the cookies bake evenly, giving you that golden‑brown finish we all crave. Once the oven is ready, set a timer for 5 minutes so you won’t forget about the preheating stage.
In a large mixing bowl, whisk together the all‑purpose flour, baking soda, and salt. This dry blend ensures the leavening agent is evenly distributed, preventing any pockets of soda that could cause a metallic taste. As you whisk, imagine the flour particles dancing together, each one ready to support the buttery foundation you’ll add later. Let the mixture rest for a minute while you move on to creaming the butter.
In a separate bowl, cream the softened unsalted butter with the granulated sugar and brown sugar until the mixture is light and fluffy, about 2‑3 minutes. You’ll notice the color turning a pale, creamy hue and the scent becoming sweetly buttery—this is the foundation of flavor. Scrape down the sides of the bowl to ensure every bit of butter is incorporated; any stray lumps will turn into pockets of dense dough later.
Add the eggs one at a time, beating well after each addition, then stir in the vanilla extract. The dough should become glossy and smooth, a sign that the emulsification is perfect. Here’s the secret trick: after the second egg, add a pinch of extra sea salt; this tiny addition amplifies the chocolate flavor dramatically. The mixture will thicken slightly—don’t worry, that’s exactly how it should feel.
Gradually add the dry flour mixture to the wet ingredients, folding gently with a spatula. Stop mixing as soon as you no longer see streaks of flour; the dough should be thick but still slightly sticky. This is the point where the dough comes together, forming a cohesive mass that will hold the chocolate chips without spreading too thin.
Fold in the chocolate chips, ensuring they are evenly distributed throughout the dough. If you’re feeling adventurous, add a handful of toasted walnuts or a sprinkle of cinnamon for a subtle twist. The dough should look speckled with dark chocolate islands, promising pockets of melty goodness in every bite.
Using a cookie scoop or a tablespoon, drop rounded mounds onto the prepared baking sheets, spacing them about 2 inches apart. The dough will spread slightly, so give them room to expand without touching. For that signature crumble look, gently press the tops with the back of a spoon to create a slight indentation—this helps the edges crisp up while the center stays soft.
Bake for 12‑15 minutes, or until the edges turn a light golden brown and the centers are set but still soft. You’ll hear a faint crackle as the cookies begin to firm, and the aroma will fill your kitchen with an irresistible, caramel‑butter scent. Keep a close eye on the last minute; over‑baking can turn the crumble into a crisp that loses its tender heart.
Remove the cookies from the oven and let them cool on the sheet for 3‑4 minutes before transferring them to a wire rack. This short rest lets the cookies finish setting while still retaining that melt‑in‑your‑mouth interior. As they cool, you’ll notice the edges become slightly crunchy while the centers stay plush—an ideal contrast that defines a perfect crumble cookie.
And there you have it! But before you dig in, let me share some tips that will take this from great to absolutely unforgettable…
🔐 Expert Tips for Perfect Results
The Taste Test Trick
Before you bake the entire batch, scoop out a single cookie dough ball and bake it on a small piece of parchment. This mini‑test lets you gauge the sweetness, texture, and chocolate distribution. If the cookie feels a little flat, a pinch more vanilla or a drizzle of melted chocolate on top can instantly elevate the flavor. I once served this test cookie to a friend who claimed it was “good, but missing something”—a dash more sea salt solved the mystery in seconds.
Why Resting Time Matters More Than You Think
Allow the dough to rest in the refrigerator for at least 30 minutes before shaping. This step hydrates the flour fully and lets the butter firm up, resulting in a more controlled spread. The resting period also gives the sugars a chance to dissolve, creating a smoother crumb. I’ve noticed that cookies baked from chilled dough have a deeper, richer caramelization on the edges.
The Seasoning Secret Pros Won’t Tell You
A tiny pinch of smoked paprika or a dash of espresso powder can add an unexpected depth that makes the chocolate sing. These subtle seasonings enhance the bitterness of the cocoa, balancing the sweetness without overpowering the cookie. I experimented with a whisper of cinnamon for a holiday twist, and the result was a warm, comforting flavor that paired perfectly with a cup of coffee.
The Butter Temperature Balance
If the butter is too soft, the cookies spread too thin; if it’s too cold, they won’t blend properly. Aim for butter that yields a slight indentation when pressed with a finger—this is the sweet spot for a tender yet structured crumb. I once left the butter out on a hot kitchen counter and ended up with flat, crunchy cookies that lacked the desired chew.
Baking Sheet Choice
Dark non‑stick baking sheets absorb more heat, causing cookies to brown faster, while light aluminum sheets provide a more even bake. For the perfect crumble, I recommend using a light-colored, heavy‑gauge sheet and rotating it halfway through the baking time. This ensures the bottom doesn’t over‑brown while the tops achieve that beautiful caramel hue.
Cooling Method Mastery
Transfer the cookies to a wire rack as soon as they’re firm enough to handle; this prevents steam from making the bottoms soggy. If you let them sit on the baking sheet, the residual heat continues to cook them, leading to a tougher texture. A quick tip: place a few ice cubes in a bowl nearby and fan the cookies gently for a few seconds to lock in their crispness.
🌈 Delicious Variations to Try
One of my favorite things about this recipe is how versatile it is. Here are some twists I've tried and loved:
Salted Caramel Swirl
Add a swirl of homemade salted caramel sauce into the dough before baking. The caramel adds a buttery richness that complements the chocolate, while a sprinkle of flaky sea salt on top creates a delightful contrast. This variation is perfect for a holiday gathering where you want to wow guests with a touch of elegance.
Nutty Crunch Delight
Fold in a half‑cup of toasted pecans or walnuts along with the chocolate chips. The nuts provide a satisfying crunch and a buttery undertone that deepens the overall flavor profile. Toasting the nuts beforehand releases their natural oils, ensuring each bite bursts with nutty goodness.
Double‑Chocolate Dream
Replace half of the semi‑sweet chocolate chips with dark chocolate chunks and add a tablespoon of cocoa powder to the dry ingredients. This creates a richer, more intense chocolate experience that satisfies even the most devoted chocoholics. The cocoa powder also gives the cookie a slightly darker, more sophisticated appearance.
Citrus Zest Surprise
Add the zest of one orange or lemon to the butter‑sugar mixture before incorporating the eggs. The citrus zest lifts the flavor, giving the cookie a bright, aromatic note that pairs beautifully with the chocolate. This variation is especially refreshing in the spring and summer months.
Spiced Autumn Bliss
Mix in a teaspoon of pumpkin spice, a pinch of ground ginger, and a tablespoon of pumpkin puree for a seasonal twist. The spices evoke the comforting flavors of fall, while the pumpkin adds moisture without altering the cookie’s structure. Serve these with a warm mug of spiced chai for the ultimate cozy treat.
White Chocolate & Raspberry
Swap the semi‑sweet chips for white chocolate chips and fold in dried raspberry pieces. The tartness of the raspberries balances the sweetness of the white chocolate, creating a sophisticated flavor pairing. This version shines at brunches and afternoon tea parties.
📦 Storage & Reheating Tips
Refrigerator Storage
Place cooled cookies in an airtight container with a parchment paper sheet between layers to prevent sticking. They will stay fresh for up to 5 days, retaining their soft interior and crisp edges. If you notice a slight loss of crunch, pop the container into a low‑heat oven for a minute to revive the texture.
Freezing Instructions
Freeze the baked and cooled cookies in a single layer on a tray, then transfer them to a zip‑top freezer bag. They keep well for up to 3 months. When you’re ready to enjoy them, let them thaw at room temperature for 20 minutes, then warm them briefly in a 300°F oven for 5‑7 minutes to bring back that fresh‑out‑the‑oven aroma.
Reheating Methods
To reheat without drying out, place a cookie on a microwave‑safe plate, sprinkle a few drops of milk around the edge, and microwave for 10‑12 seconds. The moisture from the milk creates a steamy environment that softens the interior while keeping the outer crust crisp. For a more traditional approach, reheat in a toaster oven at 350°F for 3‑4 minutes, adding a small pat of butter on top for extra richness.